|
|
||
|
|
 |
 |
|
|
|
         |
||
|
|
|||
| |||||||||||||
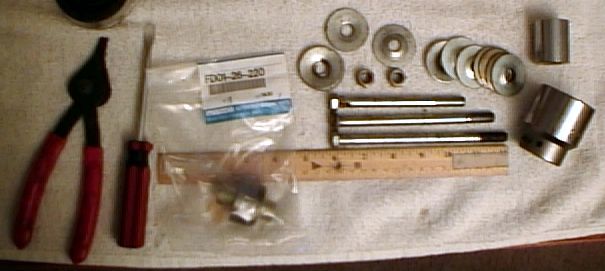
Pillow Ball ReplacementThis page describes how to replace the pillow ball bushings in the rear suspension of the 1993 Mazda RX-7 using common hand tools and without having to remove the suspension arms from the car. You can do this in your driveway in a couple of hours. Why Replace?These bushings are often the cause of clunking noises. To diagnose the bushings on your car, jack it up and wiggle the wheel around. If you can steer the wheel, you might need new toe links, too. I recommend the replacement toe links from M2 Performance as a good fix for that problem. If it moves any other directions, you probably have some bad pillow balls. The worst ones on my car were at the junction of the trailing link and the lower lateral link. I replaced those and found that the other ones were bad, too, so I suggest that you just get them all and do it all at once. You need a total of six pillow balls, and they are all the same Mazda part number: FD01-26-220. You can get these from many sources including your favorite RX-7 tuner, the dealer, or Mazda Competition Parts (provided you have an account). PreparationsThe basic technique I describe here is how to press the pillow ball bushings in and out of the suspension arms using sockets, bolts, nuts, and washers. So, before you begin you are going to need to gather up some supplies.
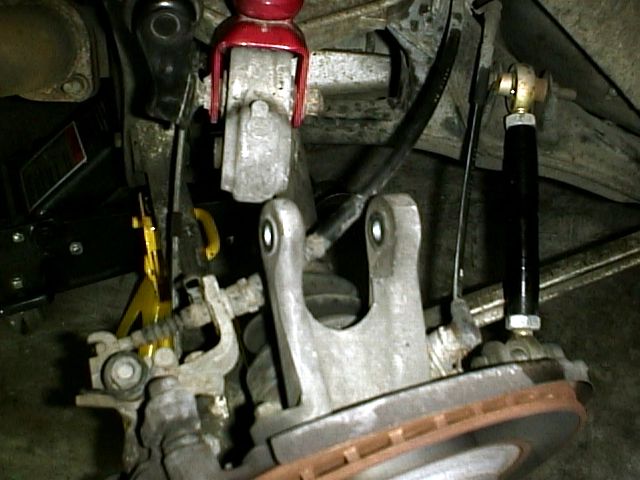
Getting StartedI am going to assume that you know how to jack up the car and get the wheel off. The pictures below show how to get to one of the bushings. The others are similar and do not require any special tactics. Just take the bolt out of the bushing and move the suspension pieces around to give yourself clearance to work. I did each of the three bushings on each side individually, with all the rest of the suspension fasteners in place. It can be kind of a pain to keep the upright out of the way for the lower, outer bushing, but I am sure you will be able to make it work. Okay, here are some pictures of how I got access to the upper, outer bushing:
Replacing a BushingAll three of the bushings (per side) are extracted and replaced the same way, so I am just going to describe the process once. Step 1: Remove the rubber seals from both sidesUse a flat-head screwdriver to pop out the rubber seals. Be careful not to damage these if you intend to re-use them. The grease on my old bushings did not show much dirt contamination, but rather the bushings just seem to wear out on their own, so I though it would be fine to reuse the old seals. Insert the screwdriver through the center and pry the seal outward. This does not take a lot of force, so if you are prying with no luck, make sure you are not hung up on something else.
Step 2: Remove the snap ring (one side)One side of the bushing will be held in place with a snap ring. Use your snap ring pliers to pinch the holes together and pull out the snap ring. Keep the snap ring because you will need to reinstall it later. You might need to clean some grease out of the way to see the holes.
Step 3: Press out the old bushingThe suspension arm in this location did not have a lot of material to press against, so I actually started with one set of sockets and finished the job with another set. This takes a little longer, but I ran out of thread anyway and this will help prevent damage to the suspension arm by spreading the load over as large an area as possible. It looks like I used the 32mm socket braced against the suspension arm on the snap-ring side (which is the side the bushing will come out of) and a 13/16" socket pressing the bushing from the other side. The 15/16" socket would probably work, too, but I guess I had the 13/16" one handy. Use lots of washers on each side because they will bend as you tighten the nut. If you don't use enough washers, the washers will bend too much and you won't be able to apply much load or even get a good grip on the nut or bolt head. Make sure you line up the sockets on both sides well so that you are applying the load evenly and are not gouging the suspension arm.
You will likely have to switch bolts or add washers once or twice during the extraction process. Always load on the washers to reduce bending and so that you won't have to stop and add more too soon. If you started with a socket other than the 1-1/2" one, you will need to stop and switch to it at some point so the bushing can be pressed out into the middle of that socket. My batteries died on the my digital camera half-way through this procedure, so the remaining pictures show the replacement process on an extra suspension arm that I have out of the car. Note that the big 1-1/2" socket is used to complete the extraction job.
Step 4: Press in the new bushingTo install the new bushing, you put the bigger socket on the other side of the arm and pull the bushing into place. The bushings are not symmetrical, so make sure that the flatter side will be near the snap ring. Also, be sure to clean out the surfaces of the bushing and the hole that it will be pressed into. I used the 32mm socket on one side and the 15/16" socket to apply load to the flatter side of the bushing. You don't need to use the 1-1/2" socket unless it helps you distribute the load on the suspension arm more evenly. Make sure to line everything up well so the bushing will go straight into the hole. If you find that the alignment is not right, loosen things up and realign before proceeding. As with the extraction, you might need to stop a few times and add washers or switch bolts. You should feel it get tighter as soon as the bushing is pressed fully into place. Stop and check your progress if you think you might be done.
Step 5: Re-install the snap ringUse the snap ring pliers to re-install the snap ring. If you can't get it into place, you may not have the bushing pressed in all the way.
Step 6: Finishing upThe bushings come pre-greased from Mazda, so you don't need to apply any extra if you don't want to. Be sure to clean up the rubber seals with a rag before you press them back into place with your thumb (they pop back into place pretty easily). It can be difficult to line the suspension parts back up with the new bushing in place. Use one of your bolts to re-orient the center part of a bushing if you need to, and don't be afraid to use a screwdriver to pry the suspension parts open a little if you have trouble lining up the holes to reinstall the bolt. Once you have the bolt in place, torque it to 50 ft-lbs. Give yourself a pat on the back, you're done! |
|
The information on this page is Copyright © 1999-2002 Max
Cooper |